Sunday, February 12, 2023

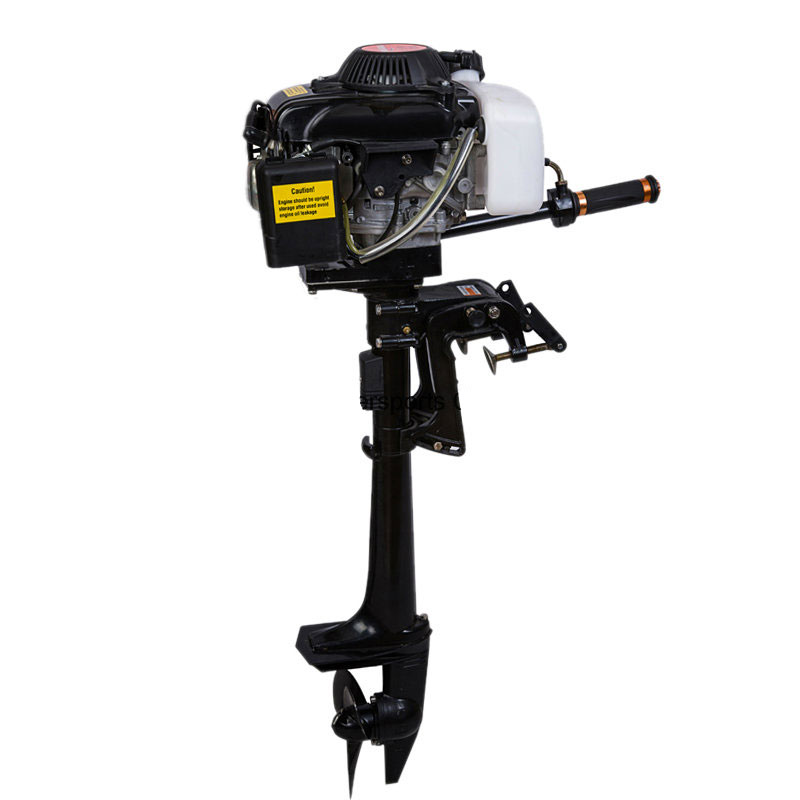
Hangkai 4 HP 4 Stroke Outboard


INSTANT VERDICT SUBJECT TO CHANGE:
The Good: Inexpensive. Easy to start. Based on proven designs.
The Bad: Have to learn maintenance/operation/servicing on the fly due to poor/wrong/absent documentation. Noisy. 
Verdict: Seems good so far, but jury's out. 

There are about a thousand of these small, air cooled outboard engines on eBay, Amazon, Walmart.com, etc. They seem too good to be true if you're in the market for a small outboard as I was. I didn't want something to set out and cross the Great Lakes...I just wanted something to allow me to hit the local reservoirs with my Sun Dolphin Sportsman 8 when there was too much water to cover with my Newport Vessels 55lb thrust electric. 

After agonizing over the little there is on the Internet and watching video after video (specifically, Youtube user Gurra has a great long-term series on this motor) I finally settled on the Hangkai 4 horsepower 4 stroke and pulled the trigger.  Now, there are subtle variations of this motor, but they are all basically the same. A Chinese Honda GXV50 4 stroke clone sitting atop what is said to be a Suzuki clone lower unit. Some are top exhaust, some are side (mine is side). Some are Hangkai branded, some are generic. But they are all built on the same platform. The genetics are good, but as we all know, anything from China can kind of get lost in the translation. 

I plan to do long-term follow ups periodically, so you can check back from time to time to see how it's going, so that others won't have to fly blind as I did. I got the motor from Walmart.com, which is handy, because if it's a total disaster, I can return it to the store in 30 days. I also got the 4 year plan from Allstate to cover any issues, because getting a warranty from the manufacturer/seller is completely hit or miss (don't get me started on Amazon-I'll save that for a later post). My general rule is, if it's over $150, and it's not a brand name I can easily pronounce, I'm getting the optional coverage.

The total cost was just shy of $350 with tax, free shipping, and extended warranty. It arrived in 3 days from a warehouse in New Jersey via FedEx, which was surprisingly good for them. Opening the box, it appeared to be in excellent shape. There was a motor, a tool kit, some spares (shear pin, cotter pin, etc), but no manual. From what I understand, this is not a big loss because the manual that ships with some is not helpful, and sometimes outright wrong. 


Unboxing. You get a tool kit, but no manual.

My motor looked completely generic. Not one word of English on the outside. Lots of Chinese. Everything else in pictograms...choke, a flaming triangle on the gas tank, etc. No horsepower markings anywhere on it. A curious thing...the gas cap has a pictogram for gas and oil...please be careful and realize that these are 4 stroke engines and you do not mix the gas with the oil. 

One of the issues that people have with this motor is that some ship with oil in the lower unit, and some do not. Also, some have a port in the lower that allows you to check, and some do not. Mine had no port, so the only option was to pull the prop and shear pin, pull the two bolts holding the gearbox cover in place, and pull that cover off. Luckily, mine had oil in it. Unluckily, I didn't realize that there was some compression within the gearbox that kept the gearbox cover from sitting flush. So, I put the first bolt in place and tightened it down, not realizing that the other side of the cover was not flush. So, when I started the bolt, it wasn't lining up correctly in the lower unit...and it stripped, the lower being aluminum. I tried several methods to fix it before I finally drilled it out, tapped it for a larger bolt, put that bolt in place and cut it off flush. I was then able to centerpunch and drill the new bolt hole to the correct size and replace the bolt. A moment of carelessness that cost me several hours time and a lot of headache. 

In the process, I destroyed the gasket behind the cover. Fortunately, there was another one in the tool kit provided with the engine. I'll be taking it back apart after 10 hours to replace the gear oil, because I have seen that recommendation somewhere on the Internet, so I'll probably buy some gasket material and cut a new one.

So, it was the next day before I was able to proceed any further. I filled the engine with 5W-30. It takes almost exactly 1/4 of a quart to get to the top of the full range on the dipstick. From what I've read, those that ship with manuals are completely wrong on this, leading people to over-fill the engine oil, which causes a lot of smoke in the best case scenario, or fouls the plug and possibly damages the engine in the worst. I had no such problems. These engines require high octane gas. I bought exactly $5 worth of 91 octane and plan to use that for the remainder of summer so I'll probably put some stabilizer in it. Of course, everyone recommends that you use ethanol free gas, but I've found that if you don't leave gas sitting in the tank or carb, you rarely have any issues running small engines on ethanol. 

Hour meter installed under the engine

One other thing I did...I added an hour meter. I highly recommend this for any small engine application, and I also did this on my Champion 1000 watt inverter generator. Basically, if it has a spark plug, you can add an hour meter to it. Just wrap the lead around the spark plug wire 5 times and run it to your meter, which can be mounted to any clean surface with some 3M tape. It takes the guesswork out of maintenance and makes it easy to keep up. Search eBay for "inductive hour meter" and you'll see items similar to the one pictured. I went with the cheapest and ended up paying $7.95 for mine. 

Mounted on the Sun Dolphin Sportsman 8

That done, it was ready to go. Since these engines are air cooled, you can do some testing with them on dry land. I put a splash of gas in the tank. Hit the primer bulb until I saw gas returning from the carb. Turned the choke on. The engine roared to life on the third pull. In less than 30 seconds, I was able to turn the choke off and let the engine settle into a nice idle. The drive system is clutched, so at low engine RPM, the prop does not turn. I varied the speeds to allow for a break in. Really, I need to run it under a load for a bit as well during break-in, so I didn't have it running for a long time. But, it ran. 

It wasn't the quietest thing I've ever heard, either. Other users extend and re-route the exhaust to quiet it somewhat, and I'll be doing the same. 

Some things to consider...the throttle does NOT stay where you put it. When you release the handle, the throttle returns to idle. Not super handy if you want to use the motor to troll while fishing, or if you want to reverse by spinning the engine around backward (there is no reverse gear). It really needs a weaker throttle spring, but it's also a safety feature, because if I should fall off the boat, the motor will go to idle and the prop (and the boat) will stop completely. Another thing, because of the side exhaust and the wiring/cabling, it is very difficult to pivot the handle over to use the motor in reverse. 

The brass screw that I assume adjusts high speed. Or, maybe not...

Sometimes, it seemed to be a little rough at higher RPM. Besides the throttle stop, there was only one adjustment on the carb that I could see...a brass screw right on the top. I gave it a 1/2 turn and it seemed to smooth out. Could have been my imagination, but it seemed to do better. 

Every hot start after that was effortless, choke-less, and on the first pull. It really is an easy engine to start. 

And that's as far as I went today. I hope to put the boat on the water sometime this week or next weekend to test real-world performance, and when that happens, I'll be back with an update. 

UPDATE: First test of the Hangkai in the water is in the books, and I'm still not regretting my purchase. I put the Hangkai on the back of my Sun Dolphin Sportsman 8 and took it over 3 miles upstream in my local river. The only reason I stopped was because I hit a set of shoals and I didn't feel like walking the boat up them. Otherwise, I could have kept going. 


The Hangkai performed as I would expect any outboard. Choke on the first start, single pull for every start after that. It does not use much gas. Yes, it's kinda loud, but it makes up for it by being slow. Honestly, this is not a four hoursepower engine. The Honda GXV50 is only rated at two, and I'm sure there's no magic in this Chinese design that doubles the horsepower. But, I was aware of that going in. The Hangkai would push the little Sun Dolphin up the river at 4-5 mph, according to GPS. I'm sure it went faster coming back down, but I didn't take a measurement. 

Other than an occasional stumble at part throttle, the Hangkai showed no issues. It started and ran every time I pulled the cord. I'll keep my eye on the stumble, but later in the day, that issue seemed to subside. 

So, the jury is still out, but I'm happy with how the motor is performing as of now. 

UPDATE: I ran into another boater who was using the Hangkai outboard. His was almost identical to mine but had a red cover instead of black. He told me he'd had his for two years and had not had a single issue with it. He said that earlier in the year, he had trouble starting it, but took the old gas out and replaced it and it started right up. He said that he did nothing special with the engine and stored it outside year-round on his boat. 

It's nice to get another data point. Seems these engines are more solid than many give them credit for being. 

Thursday, February 9, 2023

Ride 1 Up Core 5 750 Watt Class 3 Ebike Long Term Review


INSTANT VERDICT SUBJECT TO CHANGE:
The Good: Relatively inexpensive for the quality. Powerful. Reliable.
The Bad: Thermal cutoff can be a bit over enthusiastic, but it saves the motor. Why does it eat spokes? 
Verdict: If you want a cool looking, no frills ebike of premium quality for not-a-lot of money, this is the ticket. 

Earlier, I had a joke of an experience with a Chinese Vivi ebike that I got from Amazon. To be fair, there was only one flaw with the Vivi...the lack of overload/thermal protection. Had I known, I could have installed a 10 amp fuse between the controller and the motor, or the battery and controller, and it probably would still be running today. That was literally the only problem I experienced with it when I had it.

But, it was a big one.

This time, I was going to do my homework and make sure that I got something that the company would stand behind.

I read a ton of articles about budget ebikes and the Ride1up Core 5 kept coming up over and over again.

It was more expensive than the Vivi. In fact, about twice as expensive.

So, it should be twice as good, lol.

I read about Ride1up and their philosophy. They basically pick and choose solid quality components at a reasonable price and that's what goes into their bikes. There's not much proprietary on them, which makes them easy to work on should something go wrong. For example, the control display is a KD21C Adjustable Speed LCD. They're a common display and you can buy replacements on eBay. Same with the cassette, which is a 7 speed Shimano 11-32t. Also available on eBay. And of course, you can get replacements directly from Ride1up.


Complete specs.

So I sent them an email explaining my situation with the Vivi and asking how that would NOT be repeated if I bought from them. An excerpt:


Bottom line is, I would love to buy a Ride1up, but what happens if it breaks? How do I get it fixed? I literally live in the middle of nowhere. The nearest shopping mall is 60 miles away. The nearest bike shop is 40 miles away, and they don't carry Ride1Up bikes nor do they service them. I guess what I'm asking is, what if I have trouble during the warranty period? Afterward? How do you handle issues with the bikes? Also, is there some sort of thermal overload protection built into your bikes? Would it be possible to install a fuse somewhere to prevent the motor/controller from burning up like on my last one?

Their response:

We have a support team on staff available M-F 8-5 PST. You would be the eyes and ears, while they would provide the knowledge and know how. The better the pictures and videos are the better the support can trouble shoot and help if anything were to come up. We strive to keep our bikes on the roads, as that is where they belong! We have built them to stay there, so if you do come across any of the rare issues that pop up, we will work hard to remedy it. They also are willing to work with bike shops if ever your shop wants to keep up with the times and provide quality service to the future of biking. As for overload, we have fuses and protections built in :]


Bike shops around here are not an option in reality. They only tend to work on what they sell, which is fine. I'm mechanically inclined, so if I have someone to walk me through troubleshooting steps, I can probably get to the root of any problems. And from all accounts, this would be in my native language, not Chinglish.

So, I got the bike. Price delivered was $1005 after a coupon code. Very reasonable as far as ebikes are concerned.

Waited, waited, waited...FedEx...that's a completely different story. But anyways, I came home one day to find the bike out on the porch.

People complained that it was relatively "unassembled" when they got it. It was, but no worse than I would have expected. It's a bulky item shipped in a large box, but still has to be compact enough for relatively easy handling.

I had to install the front wheel, fork and handlebars, the crank, the pedals, and the seat. Instructions were mostly clear and I had no problems. The rest of the process was adjusting, which was not difficult either.


As I assembled it, I charged the battery so I could immediately take it out for a ride.

Throttle rolls in exponentially, which makes it seem slow at first, but when I got on it, it kept accelerating and accelerating. I'm a big guy, so it takes a bit to get me up to speed, but the motor is torquey and pulls just fine once you get it rolling. 750 watts moves things along nicely. Pedal assist seems to kick in more immediately than the throttle does making it easy to squirt across intersections in town.

It's pleasant to ride and feels solid. The gear selector and brakes were easy to adjust and setup with minimal watching of Youtube videos. The shift indicator matches up perfectly with the gears (like, when the arrow points to 1, you're actually in 1st gear, etc).

Brakes are highly effective. Some criticized the lack of hydraulic brakes, but they are plenty good enough.

The Core 5 is supposed to top out at 20 on throttle alone, but the motor usually cuts at 22. On pedal assist level 5, I can easily get 25-30 mph and keep up with traffic in town. It feels fast.

Range is excellent, but the battery does suffer from voltage lag. What seems to happen is that the battery goes from 5 bars to 2 rather quickly, then stays on 2 bars for a LONG time before dropping to 1. At first, I thought my battery might be a dud. Turn off the power for a bit and the battery creeps back up a bar. Riding on throttle alone, and admittedly hammering on it as much as possible, going between 15-22 mph, I can easily get 16 miles before battery cutout. I've never run it to empty while "taking it easy", but keeping the speeds to around 10 mph got me 17 miles with 2 bars of battery remaining. 20 miles on a charge if you were at all careful would be no problem.

Probably the only thing I miss from the old Vivi is the front shock. The Core 5 can be a little rough on unpacked or unimproved trails. You can ride them, but it's best if you go slow.

As for the motor protections...twice I've had them "kick in" and prevent an overheat/meltdown situation. Both have happened when I kept the motor at a sustained high speed for a long period of time. The most recent was yesterday.

A buddy and I went for a 12 mile ride on a local trail. He arranged for us to be picked up by a somewhat sketchy aquaintance and shuttled back up to the start point where our vehicles were parked.

I figured there might be issues. Instead of waiting, right before we got to the end, I turned and rode the 11 miles back up the trail on battery power alone. I set up a makeshift cruise control earlier and had set the speed on about 16 mph. About 43 minutes in, the motor hit thermal shutdown.

I started pedaling. As I pedaled, I powered down the controller and powered it back up. I set the cruise for 10 mph and made it the rest of the way with no further problems and I never had to stop the bike. Within a minute or two, I had the speed back up to 15 mph or so.

If I hadn't owned the Vivi, I would view that as an annoyance. But now I'm almost thankful. It's MUCH better than the alternative...when this happened with the Vivi, the "thermal shutdown" consisted of melting down the motor itself...which I was never able to get fixed.

I beat my buddy back to the start point. To be fair, his guy was 1/2 hour late. But, I had no problem going 11 miles in 45 minutes or so. According to my GPS, I averaged about 14 mph, even after the shutdown.

With the Core 5, you can monitor wattage output from the motor. When I was doing 16 mph, the wattage varied between 30-60 watts. When I slowed to 10, wattage dropped to between 10 and 15 watts. Huge difference, both with battery consumption and stress on the motor. Hence why I said 20 miles would be no big deal on battery if you stayed around 10 mph. (CORRECTION - I thought there was a decimal point, but there wasn't. Actual wattage was 300-600 watts at 15 mph, and 100-150 watts at 10 mph. This makes more sense).

You can also adjust the wattage output in increments all the way down to 300 watts max to prevent hitting the overload to begin with. Of course, lowering the wattage will kill your top speed...

I'm at well over 1000 miles on the Core 5 as of the date of publication. One thing that I have noticed is that the bike tends to eat rear spokes. So far, I've broken 3. This might be user error due to not tensioning spokes correctly, or it could be because the 750w motor is powerful enough to overcome the strength of the spokes. But I've never had it happen on any other bike, even the two other ebikes I have had experience with. 

Other than that, just minor adjustments and maintenance. I'll soon be coming up on a year with this bike and I'm still very happy with how it functions. 

The Indio Telecaster Classic- A lot of guitar for $100


INSTANT VERDICT SUBJECT TO CHANGE:
The Good: Looks, feels and plays like a much more expensive guitar. Neck is amazing. Price point allows upgrades. 
The Bad: The pickups sound good but the output is weak. 
The Verdict: You want to try out a Tele but don't want to break the bank? Here's your next guitar. 

A while back, I got this Indio Telecaster to satisfy my itch to have a Telecaster for recording. 

If you're looking for a brand new guitar to use as a backup or for a beginner, you can't go wrong with this one. It's also an excellent platform for modding to get a Tele style guitar that's exactly the way you want. 


Fit and finish are great. Sound is good, but the pickups could be hotter. On the other hand, they have a really smooth and mellow tone that sounds great on recordings. 

The neck is wide and comfortable, and the grain in the wood is top notch. 

Honestly, the only thing one might need to do to make this a seriously good instrument is upgrade the pickups to something with a little more power. Everything else is playable right out of the box. The guitar intonates well, stays in tune, and plays nicely.

I've owned this guitar for several years now, and I find that I go to it more than some of my more expensive guitars. It just sounds good and plays very nice. I would definitely recommend it to anyone interested into getting into guitars, or if you're a serious player looking for a cheap second guitar or a platform for modifications. 

You can find the Indio for around $100 on sale from various places, including eBay and Amazon. 

Saturday, May 30, 2020

The Steak Ninja. Gimmick? Good to Go?

INSTANT VERDICT SUBJECT TO CHANGE:
The Good: Cheap. Seems to work. 
The Bad: Hard to clean. 
The Verdict: At this price, what do you have to lose?

I like steak. If it were up to me, I'd eat it several times a week. But, good steak is expensive, and steak cheap enough to eat several times a week is better suited for covering the seats in a fine luxury car.

I experimented with a couple of different ways to tenderize a cheaper cut of steak to make it more edible.

Brining was the first. Simply putting a generous coating of kosher salt on both sides of the meat and letting it set did make it more tender. But, it wasn't a huge improvement and it made the meat overly salty in places, even after thoroughly rinsing.

I tried Sous Vide, and while I like the results of that for many things, steak is not one of them. It simply doesn't have the same flavor as a steak seared in cast iron or fast-cooked on a grill.

Finally, the Steak Ninja.

First off, the box contains several words and phrases that I like. Ninja, kick-ass, and meat. But wait, there's more!

When you press this into a piece of meat, those 56 blades penetrate and cut through the muscle fiber. Basically, it gives you a head start in the race to chew your own food. 

The Steak Ninja is a version of a device called a jaccard, which has been around for a while. So, even if you haven't heard of it, it's not exactly innovative. But, it was cheaper than any of the other jaccards that I saw for sale on Amazon. 

The blades are flat and directional. Meaning, you can run the Steak Ninja many times in different directions to make the meat more tender. 

Don't play around with it. The thing is dangerously sharp. Also, make sure you know your target and what's behind it...lol. Most often, I use the Ninja while the meat is still in the foam pack to ensure that it penetrates all the way through. But, you'll want to do this on a cutting board, not a formica countertop. 

Side effects: Thin cuts of meat become thinner. Figure a 3/4" steak becomes 1/2". You'll have to adjust your cooking times accordingly, or buy thicker meat. The last time, I used it on a 1.5" sirloin tip roast and the finished product came off the grill at approximately 1" thick, which was perfect. 

Other side effects: the meat will cook quicker. People say this is because the heat penetrates the meat through the holes, but I think it's because the meat ends up thinner. 

Things I thought would be a problem, but weren't: I figured this would dry the meat out. I've heard for years you're never supposed to use a fork to turn steaks on the grill, because any holes you poke in the meat would allow all the juices to get out. And now, with the Ninja, I'm poking 56 holes at a time in it. That didn't hurt the steaks at all. In fact, if anything, meat prepared with the Ninja comes out juicier than normal. I don't know why, but it's always good. 

Things I didn't consider would be a problem that are:  Cleaning. You have to hold the thing open by hand to get to the blades. The first time I did it, I got an inadvertent blood sugar test in the tips of two of my fingers. You REALLY have to take care to get to the blades. You can lock it closed, but you can't hold it open, so you're grabbing it tightly with one hand and cleaning with the other (I used a nylon bristle brush). 

That aside, all of the steaks that I've done with this have come out way more tender and tasty than they had any business being. I got a chuck shoulder steak (not a Flatiron) and it was tender and juicy. So was the aforementioned sirloin tip roast. Very good texture, with minimal toughness. 

Here are the pros and cons of the Steak Ninja. 

Pros: Easy to use. Cheap. Actually works. Maybe fun, too, if you're a bit sadistic. 

Cons: Thinner steaks. Does take some time to do multiple steaks. Dangerous to clean. 

All in all, if you're wanting to eat steak more, and your budget won't allow, this might be a worthwhile investment. 


Product Review: Black and Decker LSTE522 20V String trimmer

My first electric trimmer was an old Black and Decker with a built-in lead-acid battery. It worked OK, but it wasn't super powerful and it came off charge one winter and the battery was destroyed. 

My second attempt was an 18v Grass Hog. That thing served me admirably for 9 years, until the motor finally gave out. I bought another just like it used on eBay which lasted me another two years. 

I was reluctant to switch to 20v because I had so many tools that ran on 18v. And, I didn't want to be using two sets of chargers and batteries during a transition. 

Ultimately, my wife forced the change on me by getting me a Black and Decker 20v tool set for Christmas. I had no choice but to upgrade. 

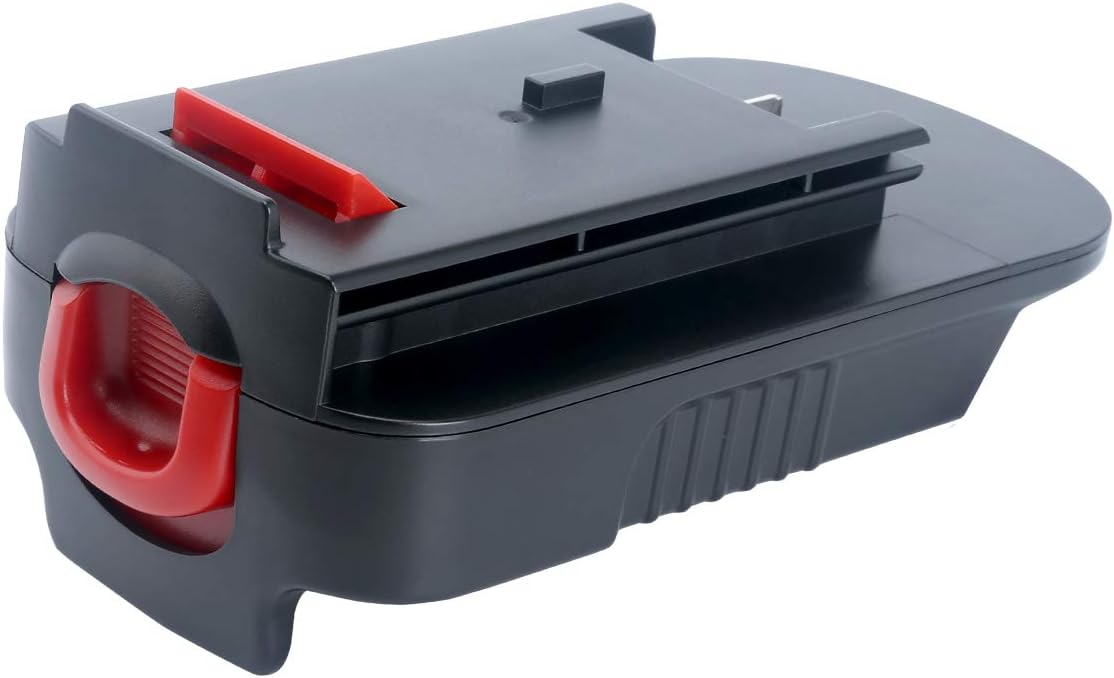
In the meantime, I found a handy adapter that lets you use your 18v tools with the 20v batteries. 

That was all it took. Now, I could standardize everything on one battery type and charging system. 

So, when my old 18v trimmer gave out this spring, I knew it would be no big deal to get a 20v upgrade, which is exactly what I did...

Behold, the LSTE522 trimmer from Black and Decker. This thing is so much better than my old 18v system. 

First, the torque. It's still not what a gas trimmer would be, but it's pretty darn good. You can clear lightly overgrown areas with it without much trouble. 

While it has more torque, the supplied line doesn't work really well for tough stuff. My advice would be to get a shaped line for it. I use a square 0.65 line and it performs much better. 

It has a line feed switch which seems to work pretty well. It also has an edging wheel, which I haven't had a chance to try. 

The hold position is comfortable, but your finger does get tired from holding the trigger. There's almost no travel to the trigger, so if you're not paying attention, you can let it off really easily. I'd rather the spring loading be a little lighter and have the trigger's travel be maybe 1/4" or so. 

My biggest complaint is one that I often have with tools of any type...they're not sized for a person over 6' tall. This is no different. The shaft extends pretty far, but I still have to hunch over to trim, meaning a sore back after a while. 3" more length would be welcome. 

The standard B&D batteries are good for about 20-25 minutes run time, which is adequate to do a small yard. Do yourself a favor and get a higher amp battery, especially if you've standardized on the 20v system.  I have a 6 amp battery, and this morning, I cleared two abandoned front yards with it in my neighborhood and had enough battery left over to knock down the grass in my front yard when I was finished.  Total run time was about 75-80 minutes. 

That same battery will run the 5" circular saw, utility saw, or drill all day long. 

No need to pay full price on the batteries. I have been buying Powerextra aftermarket batteries for years and have had good results. You can get the Porter Cable models, and with a Dremel and 5 minutes, you can modify them to fit in either the Black and Decker or Porter Cable tools. This is handy for me, because I have a Porter Cable brad nailer that also works on 20v batteries. 

I plan to buy the optional Mower Deck for this trimmer as well. 


It snaps onto the trimmer and converts it to a 12" mower. It would be perfect for my small front yard when I don't want to drag the gas mower out. 

I'll keep you updated. 


Friday, August 3, 2012

UPDATE: Further testing with the AR 15 and Tula Steel Cased Ammo

If you'll recall, I was experimenting with my AR 15 that tended to be a little cranky with steel-cased ammo.  Previously, I'd run about 150 rounds through it using a ratio of 1 brass to 10 steel cased rounds and found some success.  I finally succeeded in getting back out to the range yesterday to do further testing.

Although I didn't get to shoot as much as I wanted, I still think my results are significant.  I put an additional 50 or so rounds through the AR, which operated without a hitch.  I still haven't cleaned the gun.  Before shooting, I opened it up, and true to the Tula reputation, the insides were quite filthy.  Nevertheless, the gun operated reliably and I experienced no malfunctions of any kind in the entire 50 rounds.

For the record, that's nearly 200 rounds of steel cased ammo that I've fired through my gun.  Before I started mixing steel and brass, the same gun would malfunction on steel ammo, almost like clockwork, before I could finish the third mag.  Usually, the stoppage wasn't fixable without a cleaning rod.

Although my methods are not even close to scientific, they're good enough for me.  Yesterday, I also bought a few more boxes of steel cased ammo, which I intend to keep shooting (for cheap).

I'm going to continue this test.  I want to run the AR to failure using this dirty, cheap, steel cased ammo, performing no maintenance except for oiling with Mobil 1 synthetic 10W-40, my preferred lubricant of choice.  People may laugh at this, but I've had excellent results.  The oil stays where I put it...even after many rounds, when I open up my gun, the internals are still thoroughly coated with oil.  There's little to no cook-off, even on the back of the bolt where most of the heat and carbon usually build up.  And, the anti-deposit nature of synthetic oil means that most of the gunk is actually suspended in the oil, not fused to the metal parts of my gun.  It just works.

I figure if it holds up for a 1,000 rounds with dirty Tula, it should be just fine to shoot that much or more of brass without worrying about a significant malfunction.


Tuesday, July 31, 2012

Cinnamon and MATE on Linux - get your Gnome 2 back!


You can imagine the disappointment that many Gnome fans experienced when Gnome decided not to be Gnome anymore, and Ubuntu decided to enter the desktop environment wars with the ironically named, "Unity", which has divided users into several opposing camps regarding desktop environments.  Regardless of your pick, one thing was certain...Gnome was gone and wasn't coming back.

Or was it?  From the instant that Gnome decided to become a cell-phone interface, and Ubuntu followed suit, some intrepid developers decided to save the Gnome we knew and loved, or at the very least, a Gnome-like interface.  The result is two desktop environments that are very similar to Gnome 2: MATE and Cinnamon.

 Cinnamon, tweaked to look like Gnome 2

The default Cinnamon, when running on Linux Mint, follows a Windows paradigm with a toolbar at the bottom and a "start" menu on the left.  It can be configured with top and bottom menu bars, and offers an "Applications Places System" menu, just like classic Gnome.  You have to configure it this way, but it can be done.

 MATE, tweaked to look like Gnome 2

MATE looks almost exactly like Gnome 2, but again, on Mint, requires some changes to replicate the good ol' Gnome desktop.  After some tweaking, it feels just like Ubuntu 10.04 or so, and works just like it too.  The only difference I could see is that there's not a User menu on the top right that gives you IM, social media, and media player status like the old User menu on Ubuntu did.  Not a deal breaker, though, as most other Gnome functions are duplicated rather faithfully.

So, which do you choose?  If you want a desktop that replicates Gnome in look, feel, and function, and lots of configurability options, you'll want MATE.  I tend to think of it as a "Gnome 2 Legacy" desktop.  It seems to be a bit less buggy on my system, although your results may vary.  Cinnamon, on the other hand, would be good for someone who would like to use a "Gnome 3 Classic" style desktop - meaning, a desktop that follows the Gnome 2 paradigm, but adds lots of cutting edge features, although you sacrifice some ability to customize (the only option in the Appearance dialog is to reset the wallpaper)  You'll still feel like you're using the next, fancier version of the classic Gnome Desktop.  And, I expect Cinnamon to be better in the next version.

The only bug I experienced with either was with Cinnamon.  Every time I started Google Earth, I got a "phantom window", that opened in front of the tool bar at the top of the application.  There was no "x" to close, and the window would not move or resize.  The only way I found to fix it was to log out and log back in with MATE.  As a result, I've stuck with MATE and it has worked well for me.

The beauty of Linux is that you can try either one.  In Mint Linux, you can look for "mate-desktop-environment" or "cinnamon" in Synaptic, or open a terminal and type, "sudo apt-get install mate-desktop-environment" or "sudo apt-get install cinnamon".   There are also ways to add either environment to an existing Ubuntu install, but those methods are more involved than I wish to go into here.  Use your Google-Fu. 

So, if you think that Gnome 3 and Unity are complete wastes of time, install Cinnamon or MATE and start tweaking.  You'll be home in no time.